Friday, June 21, 2013

Not What I Should Be Doing.....

Time is fast approaching when I will spend almost two weeks with my sister. When I am there we are mostly house-bound (no car). Last year I took some embroidery kits to work on while we sit and visit.  Long before going, I had planned to make a cute little needle book similar to those I had been seeing on Pinterest. As it goes with a lot of my good intentions, it didn't get done. So two days ago, I thought, here I am again without having carried through with my much desired little needle case! I got busy........


I found a scrap of old grainsack fabric that I thought would be just the thing, cut a rectangle, approximately 7" x 10". I used a small checked piece for the lining, cutting it the same size.


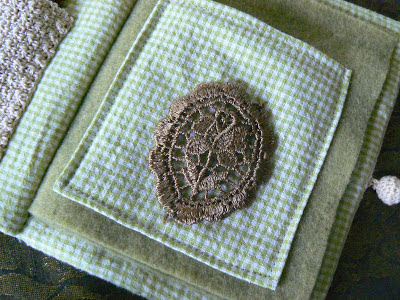
I drew a simple design of flower stems with pencil onto the right side of the plain fabric, knowing this would eventually be the "book" front. I didn't have a completed plan in mind but just started looking through my supplies to see what might work. I decided to use buttons instead of embroidering flowers - a time saver. I liked the look of the four flowers but, it needed something more.  I added the little strip of lace. I did have in mind, before starting, to have the word, "needles" on the front and drew that with pencil and then embroidered it.  The little crocheted round piece came from my stash and is the front side of a loop and button fastener.
 Next came the machine sewing. I sewed the lining and outside together, right sides together,  leaving a small opening to turn it. Oh, I forgot. I also cut a piece of thin batting, same size,  and put it on top after stacking the other two pieces. When you turn the front and lining the batting will be inside.


I cut a piece of felt for the "pages" about an inch smaller than the total sewed size of the piece.  I placed the felt piece on the inside of the open piece, folded both pieces in half keeping them together. With the front side up, I machine stitched about 3/4 inch from the folded edge and this secures the pages and makes the folded book shape. I hand stitched the little crocheted piece, leaving the top open to form a pocket. Sorry, before I did that I hand sewed the buttons on it to form the flower. The little green checked piece on the right is also a pocket, machine stitched on.


The oval is a machine made lace piece that I found in my "stash".


The opening page - needle holder.  I recently bought a half yard of fabric labels with several different designs. These two are perfect for this purpose.


On the inside of the back cover I put the little pocket and strip of measuring tape ribbon to hold my scissors.

 
The back is not especially cute but, I am o.k. with that.


So now, at last, I have the cute little needle keeper and will enjoy using it as my sister and I sit and reminisce and solve all the world's problems. Yeah, with all the things I need to be doing to be ready to travel, it was not high on the list but, I am glad I took the time. By the way, Mamie is 92 and still sharp as a tack! After reading this, she informed me that she is more like, rusty as a nail. Like I said, sharp as a tack!
~~~~
Linking to A Favorite Thing - Mockingbird Hill Cottage
 

Wednesday, June 19, 2013

My Lil Garden.......again.

..........I would never have thought I would be showing this again this soon with so many changes. I believe I said something in Lil Garden's reveal that left the impression that it was basically finished and also that I didn't want to be spending much money on this little project.


Well, I haven't spent much money but, several things have been added and some changes made. What happened is a day or so after the reveal, my daughter sent me an ad from ABC Distributing Company. If you know this company, you know they sell things a good bit lower than the same things would be elsewhere.  

 
The ad was for a set of seven things for a miniature garden. The total price for the set was what about two of the pieces would be from a different store.


It so happened that one of the items was this arbor which is something I had already thought was needed, right up front here.  It has turned out to be perfect - gives a good entrance and makes the walk look more like it belongs, too. Before I show more, I should list the other things from the set. Along with the arbor, I got a white fence, white bench, bird bath, welcome sign, a fairy and a watering can.


I got these two little boys from a local nursery for $2.00 each. The fairy that came with the set is too big. Plus, I didn't really want this to become a "fairy garden". I love the little boys and they are a good size.


The angel, which I already had, is over-sized but, I like it for the garden-angel.


 Here you see the welcome sign and the watering can, also a bit large but it is a very nice watering can.


I really should get this grass mowed!


I like the combination of the white wooden fence and the metal one.  And, now the whole garden is surrounded with fencing.


This glass cup is every bit of 1/2 inch tall.


I love the way the fence is reflected in the birdbath water. That is one thing missing in Lil Garden - birds.


The big birdhouse is still empty.


Here is the duck and egg. The duck seems to have chosen this corner to hang out in.


I think I had mentioned in the first post that I bought a wooden gate that didn't really work very well. Now, with the white fence, it does! I like it back here in the corner - the back entrance/exit.


The plants are all doing well, except the thyme didn't make it. I may try again to get some to root because it has the tiny leaves the garden needs. I have thought of one other thing that I would like to work in and that might be an excuse to show Lil Garden one more time a little later.
~~~~~~
What do you think? Do you like the changes? Any suggestions.


Monday, June 17, 2013

.......Always, Not Enough or Too Much......

 ........... Rain, that is.  In the winter we never get enough and need to do a lot of hand watering but, this is our rainy season, after all. Two days in a row with torrential downpours on already water-logged ground. The weather reporter said we got 2-3" yesterday and it only rained about twenty minutes! Then along about 3:30 last night I woke up to yet another hard rain, with no place for it to go......

This was made yesterday afternoon, from the edge of my yard and shows the end of the street, totally flooded over. A large portion of my back yard has turned into a pond, again! I didn't even want to look out there this morning at the break of day.  In spite of the excess rain I have had a lot of blooms from plants on higher ground. Last week I gathered enough roses for the second bouquet for the library. It was not quite as pretty as the first one.


Here it is in it's place in the library and showing a different side.


love the close-up view of Clair Matin in all her old fashioned glory. She blooms in big clusters. She is a climber. I had her growing on a metal trellis until hurricane Charley came along. Charley blew the whole thing over and broke the trellis. Since then, she has just been sprawling over a large area. 


Out front the old fashion lilies are blooming. This one and....

 
....this one are from divisions of my friend's lilies. Her starts came from her family who lives in Difficult, Tennessee or is it Defeated, Tennessee. The family is scattered in or near those two towns. I wonder how they got their names!!  Anyhow, I am very happy to have these lilies.


The Stokes Asters have been blooming nice this spring. I keeping hoping more plants will spring up, which is their nature.


The stems grow so tall that they eventually fall over.


This Tabouchina or Princess Flower has had blooms ever since I planted it several months ago. This one is a dwarf and is about three feet tall. I am hoping it will get to be at least four feet.


The blossoms are almost neon purple!


It is the season for caladiums. They disappear in the fall and make their appearance again in the spring.


My favorite one, by far, is this variety. Doesn't it look like it was splattered with a paint brush? I am trying it in a new location.


It looks good nestled here among the spider plants. It should grow to cover over most of the mini-bark that is now showing.
I have many more plant pictures but will save the rest for another time.
~~~~~
As always, thank you for stopping by

Wednesday, June 12, 2013

Garden Journal Pages.......


.....All it took to get me started on journaling again was the post on Garden Journaling .  You might want to read that one first if you missed it. Included there is a small article I wrote on  garden journaling I am so glad to be back "at it".  It is one of my favorite activities to do and I love the finished books.  So, today I want to show you my progress so far.....


I have worked on three pages only (front and back) but I have a lot of pictures. This post will be more pictures than writing - I hope you don't mind.  I guess that is the way most of my posts are, really. I always start a new book with an introductory page (fly leaf?). This is a page I took out of a thin, inexpensive journal. Everything was already on here except the little butterfly card with the date.


A picture of the front of the full-size three ring binder.  I found this one about three years ago before I needed a new one but knowing how hard it is to find a paper covered binder, I bought it ahead. I dislike plastic with a passion! And, we know that is about the only kind of binders available now.


I will show the two-page openings and then go back and show one page at a time and a few close-ups. You will be able to read the words on those. I try to coordinate the two open pages, somewhat.


O.K. Back to the first opening. The curved pocket with the big flower was already on the inside of the front.  I added the printed words.


I love to write words around the shape of a picture, cut-out etc. I keep a large white envelope stuck down in this pocket and use it to collect small things that might be used later in the journal.


I already had the small stamped card with two tiny brads (love!) and added the starting season for this journal. All my pages are card stock that I usually glue a printed or plain-color sheet over, before punching three holes for the binder. Yes, journaling this way does take some time but it is well worth it if you are a "visual" person and like graphics like I do. I always use rubber cement for adhesive and sometimes, raised-sticky dots.


Here I used a cut down decorative scrapbook page. The little rectangle with "grow" is an addition as well as the word "spring and the little flower under it. Again, I put the saying around the hat picture.


The "clock" was bought at Michaels in the scrapbook section. Of course, I had to buy a pack to get one. The rest will be used on cards.


I still plan to put something on the grid paper.


flower add-ons


The white card opens and will have something inside eventually.


A page from a pad that I found in a  Michael's dollar bin.


You wouldn't believe how many little lined note pads I have! And, I can't emphasize enough how having a big stash of this type of thing, makes journaling far more fun.  The big card at the bottom is a card from Michael's, too. The front lifts up and the card will get a garden photo added inside.


I use raised, add-ons (and regular stickers) a lot - makes a page more interesting and can also cover small writing mistakes.


Another favorite thing is using envelopes glued to the pages with the back side up. I lined the flap of this one with striped paper because I didn't care for the all white look. They make great pockets to insert all kinds of small things.


This page is ready for words, add-ons or whatever.  I like to keep a few started pages like this ahead.


Another started page with nothing but a huge butterfly glued down. I printed it awhile back and probably got it from my Graphics board on Pinterest. You can expect to see some words around this butterfly later.
~~~~
Thanks so much for stopping by.
~~~~~~
Linked to A favorite thing #41- Mockingbird Hill Cottage