.....All it took to get me started on journaling again was the post on Garden Journaling . You might want to read that one first if you missed it. Included there is a small article I wrote on garden journaling I am so glad to be back "at it". It is one of my favorite activities to do and I love the finished books. So, today I want to show you my progress so far.....
I have worked on three pages only (front and back) but I have a lot of pictures. This post will be more pictures than writing - I hope you don't mind. I guess that is the way most of my posts are, really. I always start a new book with an introductory page (fly leaf?). This is a page I took out of a thin, inexpensive journal. Everything was already on here except the little butterfly card with the date.
A picture of the front of the full-size three ring binder. I found this one about three years ago before I needed a new one but knowing how hard it is to find a paper covered binder, I bought it ahead. I dislike plastic with a passion! And, we know that is about the only kind of binders available now.
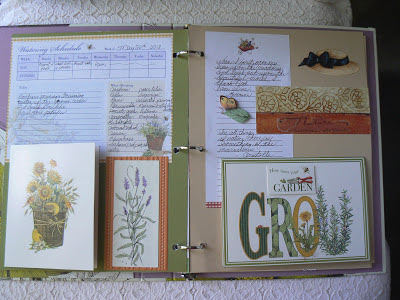
I will show the two-page openings and then go back and show one page at a time and a few close-ups. You will be able to read the words on those. I try to coordinate the two open pages, somewhat.
O.K. Back to the first opening. The curved pocket with the big flower was already on the inside of the front. I added the printed words.
I love to write words around the shape of a picture, cut-out etc. I keep a large white envelope stuck down in this pocket and use it to collect small things that might be used later in the journal.
I already had the small stamped card with two tiny brads (love!) and added the starting season for this journal. All my pages are card stock that I usually glue a printed or plain-color sheet over, before punching three holes for the binder. Yes, journaling this way does take some time but it is well worth it if you are a "visual" person and like graphics like I do. I always use rubber cement for adhesive and sometimes, raised-sticky dots.
Here I used a cut down decorative scrapbook page. The little rectangle with "grow" is an addition as well as the word "spring and the little flower under it. Again, I put the saying around the hat picture.
The "clock" was bought at Michaels in the scrapbook section. Of course, I had to buy a pack to get one. The rest will be used on cards.
I still plan to put something on the grid paper.
flower add-ons
The white card opens and will have something inside eventually.
A page from a pad that I found in a Michael's dollar bin.
You wouldn't believe how many little lined note pads I have! And, I can't emphasize enough how having a big stash of this type of thing, makes journaling far more fun. The big card at the bottom is a card from Michael's, too. The front lifts up and the card will get a garden photo added inside.
I use raised, add-ons (and regular stickers) a lot - makes a page more interesting and can also cover small writing mistakes.
Another favorite thing is using envelopes glued to the pages with the back side up. I lined the flap of this one with striped paper because I didn't care for the all white look. They make great pockets to insert all kinds of small things.
This page is ready for words, add-ons or whatever. I like to keep a few started pages like this ahead.
Another started page with nothing but a huge butterfly glued down. I printed it awhile back and probably got it from my Graphics board on Pinterest. You can expect to see some words around this butterfly later.
~~~~
Thanks so much for stopping by.
~~~~~~
Linked to A favorite thing #41- Mockingbird Hill Cottage


Thank you Betty for sharing some more of your journal pages, such an inspiration. I sorted out some of my old card making stock, stamps, papers, inks, stickers I'd forgotten how much I had. I hope to get started on my first garden journal at the weekend. Hope you have a lovely weekend.
ReplyDeleteGood for you, Joanne. Sounds like you are off to a good start. I hope you will enjoy this type of journaling as much as I do. I just sorted through my very large amount of saved things for this purpose, separating small from large, etc. Now, I will remember what I have and where they are. Keep me posted on your progress.
ReplyDeleteBetty
On my...this is just lovely! It looks like so much fun to do; so creative
ReplyDeleteI love this. So unique.
ReplyDeleteWonderful idea!!
ReplyDeleteI love journaling and creating a book. I have made SMASH books. Have you heard of them? Yours is really beautiful. I love writing around graphics too. Thanks for sharing with us.
ReplyDeleteThanks for visiting. I have heard of SMASH books but don't know exactly what they are. I would like to see an example sometime.
DeleteBetty
It's beautiful, Betty! Far more interesting and lovely and inventive than mine. Bravo!
ReplyDeleteThanks so much for joining in this week.
xo
Claudia
Thank you for providing a place to share once again. A journal is a personal thing with no "right" or "wrong" method that would apply to everyone. They can be very different, one from another, and still be valuable.
ReplyDeleteBetty